How to create a Lesson using the Interactive Video Component?
Using this component, videos may be enriched with extra pictures, tables, hyperlinks and all the available interactive components. Interactive summaries are added to the end of each video. Just click on the icons that appear while the video is playing and you can see the explanation or you can take some quiz as well.
When to use this Component
Interactive videos are perfect when you already have a video clip that you want to enrich with interactive elements. You can facilitate differentiated learning by adding in-depth information such as pictures, tables, text and links that the learner can interact with during video playback.
How it works
- User plays the video by clicking the Play button or the Challenges button on the interactive video.
- Interactions such as images, elaborating text, links and quizzes pop up while the learner watches the video.
- The user clicks on any of these icons and the relevant lesson, hyperlink or questions appear over the video.
- The user completes or closes the tasks.
- At the end of the video, a summary question is presented. The user can take that question as well.
Features of this Component
-
This is one of the most interactive components in the Responsive E-learning components.
-
The Interactive Video content type allows you to add interactions on top of video clips.
-
You can add bookmarks in the video.
-
You can set to pause the video whenever there is a lesson or interactivity on the video.
-
You can pause, play and mute the video just like any other player using the control buttons on the bottom of the video.
-
You can include almost all the Responsive E-learning components in the Interactive Videos.
-
You can add the components to the Interactive Videos just like you add them in any Presentations.
-
You can set the intervals and durations of the components very easily.
-
A summary question can be added at the end of the video as well.
You can create a page using this component by following the below steps.
Step 1: Go to the required Slide
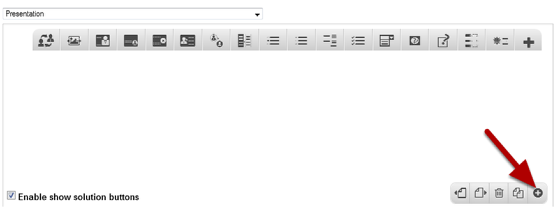
If you are creating a new Presentation, you will be taken to the first slide where you can use this component and create a page. Alternatively, if you want to add a new slide where you want to use this component, click on the '+' icon on the lower right corner as shown in the above image.
Step 2: Click on the Interactive Video Component Icon
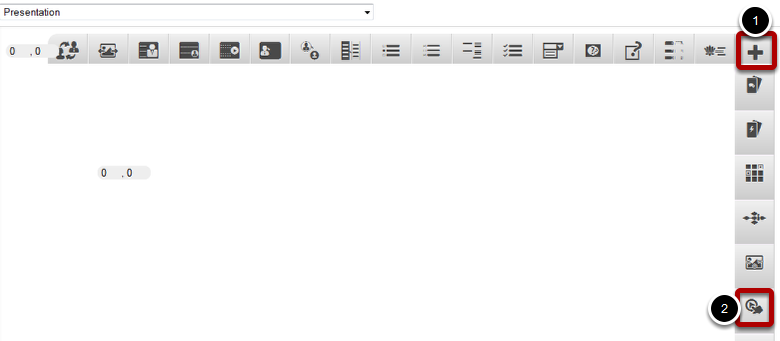
Click on the More elements [1] then click on the Interactive Video Component [2] component icon as shown in the above image. You will see a screen similar to the image shown below.
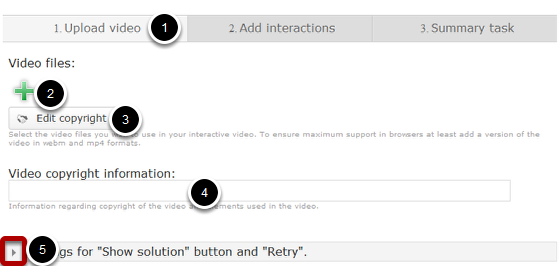
The above screen shows the Upload video [1] tab of this component’s settings. On this screen, you can
- Add a video file by clicking the ‘+’ icon under Video files [2] title and edit its copyright details by clicking the Edit copyright [3] button.
- Add more copyright description in the Video copyright information [4] field.
- Click the arrow button with title to reveal the options under Settings for "Show solution" button and "Retry" [5] title.
Step 3: Upload a Video
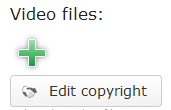
Press the plus button under the Video files title to select a video file for upload as shown above. You will see the below screen prompting you to select the video file that you want to upload. Go to the desired folder and select the video file.
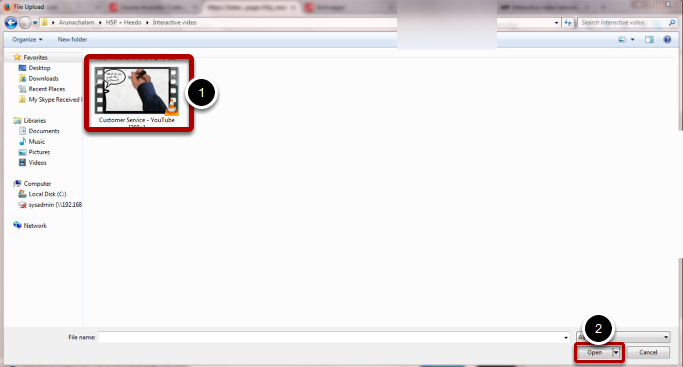
Double click the video file [1] or click the Open [2] button as shown in the above image.
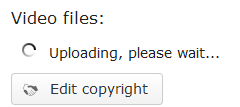
You can see the video being uploaded as shown in the above image. Once uploaded, a square black icon with the file format written in it, will appear as shown in the below image.
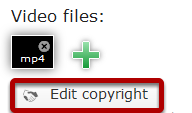
You can see that the video has been uploaded successfully on the above image. You can update the copyright details of the video by clicking the Edit copyright button shown above. You will see the below screen.
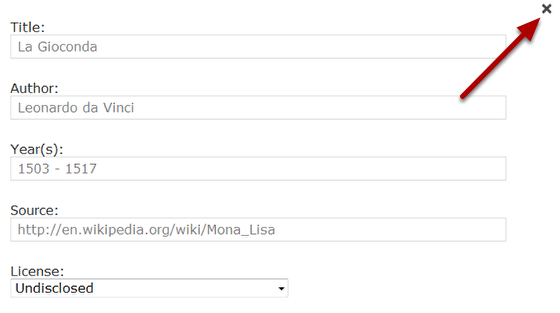
On the above window, you can update the copyright details and click the Close button to save the details. You can also add additional copyright details by entering it in the Video copyright information field shown below.
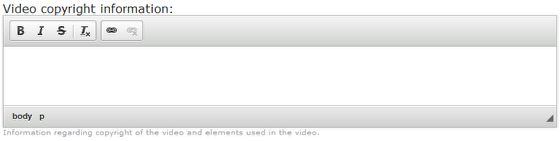
On the above field, you can give some information regarding copyright of the video and elements used in the video. You can format the contents in this field as well.
Step 4: Update Settings for the Show Solution and Retry Buttons (Optional)
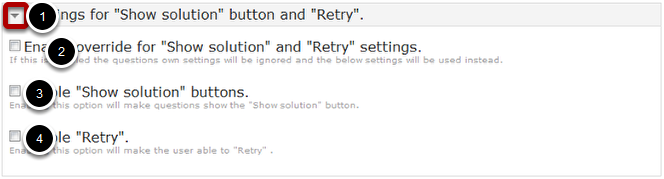
Optionally, you can click the arrow button with title Settings for "Show solution" button and "Retry" [1] and update the settings for the Show solution and Retry buttons. On this screen, you can
- Check the Enable override for "Show solution" and "Retry" settings [2] checkbox to override the Show solution and Retry settings
- Check the Enable "Show solution" buttons [3] checkbox to enable Show solution buttons for all the components.
- Check the Enable "Retry" [4] checkbox to enable the retry option.
Step 5: Go to the Add Interactions Tab
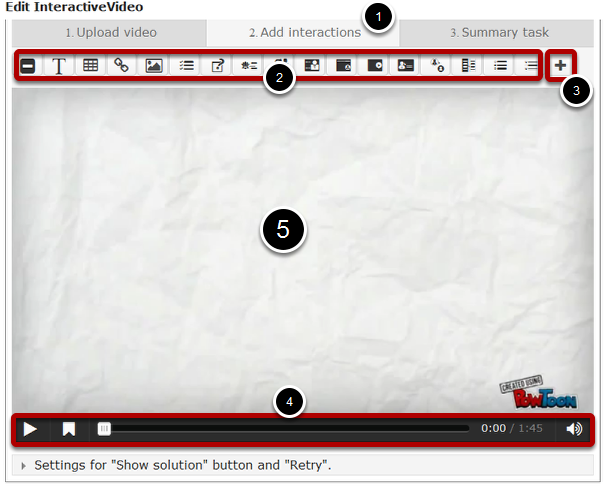
Once you've updated the information on the Upload video tab, move to the Add interactions [1] tab. The screen will look similar to the above image. On this screen you can
- Click the first set of icons of the available components from the components toolbar [2].
- Click More elements [3] button to reveal the second set of the available components.
- Adjust the control buttons in the player control bar [4].
- View a preview [5] of the uploaded video.
Step 6: Start adding Components

Play and pause the video where you want to add the component. You can also go to the desired point of time in the video by moving the play head to a desired point. Then click the required component from the components toolbar. Alternatively, you can click, drag and drop the required component into the area where you want to place the component. If you are unable to see the required component, then click the More elements button shown in Step 4. Now you will see the second set of the available components in the second row as shown in the above picture.
The following components are available for your video:
• Description Text
• Tables
• Hyperlinks
• Images
• Statements
• Fill in the Blanks
• Drag and drop into Image
• Drag the Words
• Mark the Words
• Conversations
• Text with Image
• Text with Image at bottom
• Text with Video
• Click to reveal Text
• Click to reveal Images
• Click to reveal Tables
• Multichoice Questions: Type 1
• Multichoice Questions: Type 2
• Multichoice Questions: Type 3
• Dropdown Questions
• Free Text with Feedback
• Match and sort
• Dialog Card
• Flash Cards
• Memory Game
• Image Hotspots
• Timeline
Apart from the Responsive E-learning components, few more components are available in the Interactive Video component, such as Description Text, Tables, Hyperlinks, and Images etc.
An Example for adding Components

For a better understanding, we can have a look at an example on adding components to the Interactive Video component. In our case, we are about to add a simple picture using the picture component. First, play the video and pause it at the desired time. Then click the Image component shown above. Immediately, the below screen appears.
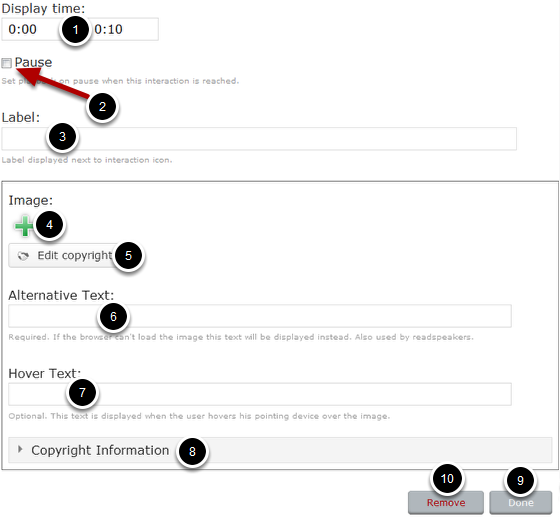
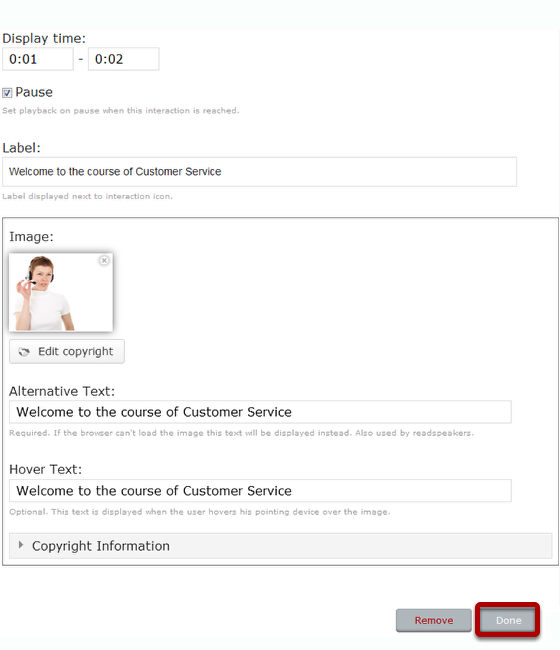
On the above screen, you can
- Set the starting and ending times between which the component’s icon will appear on the video. You can update these timings in the Display time [1] fields. By default, the starting time is the current time in the video and the end time is the current time + 10 seconds.
- Check the Pause [2] checkbox if you want to set playback on pause when this component’s time has arrived on the video.
- Type text for the label in the Label [3] field. This label will be displayed on the video when the time for the component has arrived.
- Add the image by clicking the ‘+’ button under Image [4] title.
- Edit copyright details of the image by clicking Edit copyright [5] button.
- Add an alternative text for the image in the Alternative Text [6] field.
- Add a hover text for the image in the Hover Text [7] field.
- Click the arrow button with heading Copyright Information [8] to update the copyright details of the image.
- Complete editing the page by clicking Done [9] button.
- Remove the component from the video by clicking the Remove [10] button.
Once you've updated all these information, it will be something like the above image. Click the Done button shown above to save the changes. You will see the below screen.
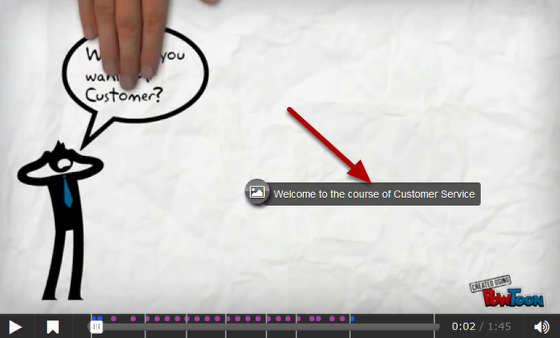
You can see the component being added to the video at the point of time we specified. You can drag and drop the component's icon to anywhere on the screen as per your design. While playing the video, if the user clicks this icon, he/she will see the image that we've uploaded.
Step 7: Add more Components (Optional)
Similarly, you can add more components to the video in places and timings of your choice. For any questions about any component, see its documentation. You can place as many components as possible, and you can use the same component again and again. The player control will show the timings of the added components in small dots [1] as shown in the above image. Each dot indicates that there is some component added to the video on that point of time.
Step 8: Add Bookmarks (Optional)
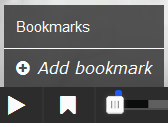
Bookmarks are used to indicate a new topic, an important interaction or an event within the video. Each bookmark is indicated with a vertical line on the seek bar. Learners can jump directly to a chapter by pressing the bookmarks in the bookmarks menu. Bookmarks are displayed in the bookmarks menu, which is opened by pressing the Bookmark [2] button next to the Play [3] button shown in step 7. You add a bookmark by moving the play head [2] to a desired point in the video and pressing the Bookmark button. You will see a popup just like the one shown above. From the menu that appears, click Add Bookmark.
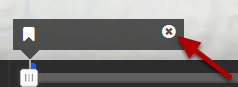
You will see the above popup window where you can specify the name of the bookmark. Once you've typed the bookmark's name, click anywhere outside to save it. You can also delete a bookmark by clicking the Remove button shown above.
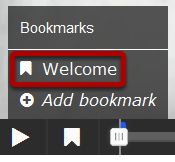
You can see the bookmark being added in the above screen. You can add more bookmarks in the same way. At any time, you can go to a specific point of time in the video by clicking the name of the relevant bookmark.
Step 9: Add Summary Task
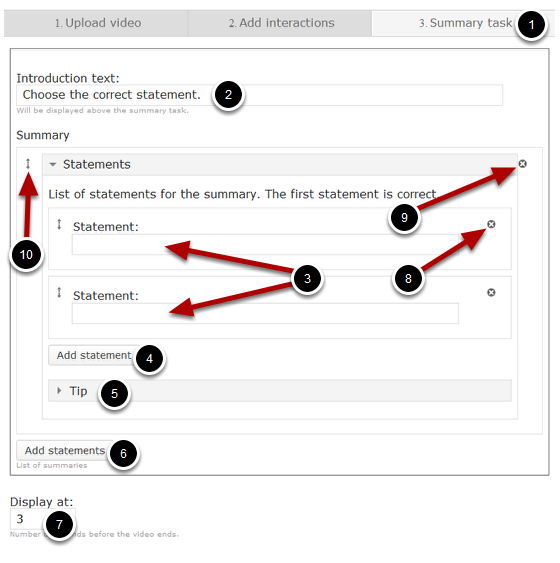
The summary task will be displayed towards the end of the video. At the end of an Interactive video, you can add a Summary. The Summary is intended to make the learner reflect on the learning content presented in the video. Once you've added all the interactions to the video, go to the Summary task [1] tab as shown in the above image. On this screen, you can
- Place some introduction text in the Introduction text [2] field.
- Add statements in the Statement [3] Fields under the Statements title. Enter the correct statement as the first statement.
- Add more statements by clicking the Add statement [4] field.
- Add tips to the question in the Tip [5] field.
- Add more questions, i.e., more set of statements by clicking the Add statements [6] button.
- Specify the number of seconds the summary questions should appear before the video ends in the Display at [7] field. By default, it is set to 3 seconds.
- Remove a statement by clicking on the Remove Statement [8] button.
- Remove a set of statements by clicking on the Remove Statements [9] button.
- Change the order of the Statements by dragging the Double Headed Arrow [10] button on the top left corner of the Option window.
You can create as many sets of summary questions as possible.
Step 10: Click the Done Button

Once you've updated all the details, click the Done [1] button shown above to complete editing the page. You can cancel creating the page just by clicking the Remove [2] button shown above. If you click the Done button, you will see the below screen with a preview of the created page.
Step 11: Click the Create Button
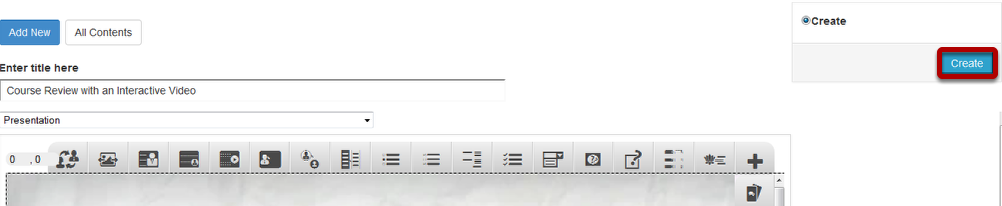
If you still want to edit the page, just double click on the preview page, and you will be taken to the Edit page. If you've done all the changes, you can click the Create button as shown above picture to finish editing the page.
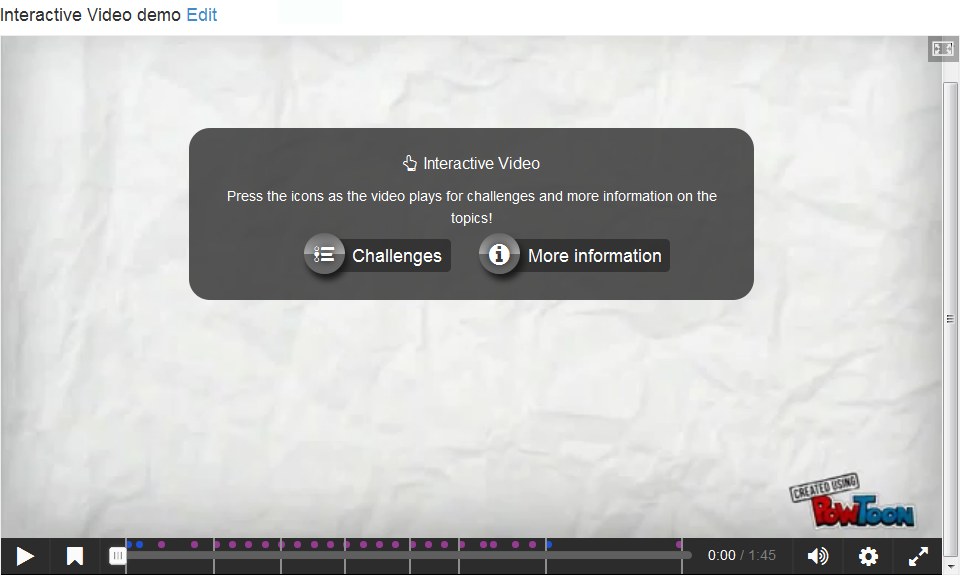
You can see the finished page as shown in the above image.
Notes
- You can upload videos only in .mp4 and .webm formats.
- The .mp4 video format will work in most browsers. However, you should provide an alternative video in .webm format just to be sure.
- Opera browsers, for instance, does not support the .mp4 format at all. You can check which browsers support the .mp4 video format here.
- In order to convert the .mp4 video to a .webm format, you can use an open-source converter such as Miro.
- Once you’ve uploaded a video in .mp4 format, press the plus button again to add an alternative video format in .webm format to ensure support in all browsers.
- You can double-click on interaction icons to edit interactive elements.
- You can upload images in .jpeg, .png and .gif formats only.
- You can add a component to your video more than once.